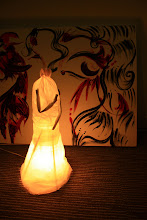
prototype!
Analyzing the prototype
Discussion: We went through the process of making the prototype. We thought of the possible ambiance for the prototype. We even talked about experimenting with different elements such as wires, paper bags, straws, scotch tapes, bubble wraps and newspaper.
Materials used: Chop stick, plastic, plastic bottle (1litre), rubber band, light bulb, tip of a plastic container


First prototype: motive is to try out the material used. (pictures from robin’s prototype)


-Plastic
:whether it melts if placed around a light source for a period of time.
: to see if the overlapping plastics can be very visibility
-Light bulb


: to see whether the type of bulb used has a better life span
: to see whether it breaks or spoil easily with abrupt movements
: positioning of the light bulb in the plastic bottle.


Question Asked
: can we try different material on the light source? What effect can it give?
: will a different material illuminates a certain kind of lighting or ambiance? What is it?
: due to the different kind of illumination from using different types of materials, what kind of location can the sculpture be placed?
: which type of light are we using? ( white or yellow?)
: what are the activities audience can do with each light? (reading, soothing for bed time?)
: what kind of light bulb size are we using? What will be the strength and weakness of using each light bulb size when placed at strategic spot?
Second prototype: motive is to experiment with different types of wire checking for sturdiness and weight limit.
-Wire (flimsy wires with plastic coatings used to tie up cables)
: to check out the sturdiness. First trail, I used one layer of wire to create an exoskeleton. But it was too flimsy to support itself.
Second trial, I double the layer by twirling it together hoping for a better support. But it was just too flexible and soft-like.
Process of making prototype 2:
 Picture 1.1
This is the documentation of the second trial. In Picture 1.1, the wires are being twirl together to form a sturdy cylinder like exoskeleton.
 Picture 1.2
In Picture 1.2, the twirling wires have been supported by using more of the flimsy wires.
 Picture 1.3
After finishing the wires, strips of plastic are being cute to form the cover of sculpture. In Picture 1.3, there are cut plastic strips and sticky glue which are being used.
 Picture 1.4
This is the output after gluing strips of plastic onto the exoskeleton.

 Picture 1.5 and 1.6
This is the finalized look when placed on a light source. From this documentation, I have tabulated that the type of wire which is a flimsy wire could not be used in our final exoskeleton sculpture.
REASONS TO WHY WE SHOULD NOT USE THE WIRE
: the flimsy wire has low tolerance of weight support
: in Picture 1.2, the exoskeleton tends to slant to the side showing the unsteadiness of the material
: the flimsy wires are too flexible even when doubling the layer by twirling the wires together
Analyzing the bottom half of the sculpture. The Skirt.
Discussion: Initially, we wanted to make the bottom half of the skirt to be something like ‘Wayang Kulit’. But we found some difficulties.-Initial idea: to paint or draw a batik design on a light bulb.
-Current idea: to paint batik design on the plastic covers itself.
WHY?
: for aesthetic purpose
: to enhance the artistic version of our sculpture
: to showcase a versatility of paint in any material
-Lights used on the skirt
: 4 long fluorescent lights placed against each other
: normal rounded light bulb placed in a long series
Questions asked
: will the paint on the plastic fade off with it comes in a contact with water?
: wouldn’t the 4 long fluorescent lights be very heavy and not user friendly?
The making of our exoskeleton. TRIAL 1
(which would be carried our on 6 May 2009)
These are the material needed for the first trial.(which would be carried our on 6 May 2009)
: mechanical tools (screw drivers)
: hoola hoops
: rattan
: loads of white plastic bags
: batik cloth
: paint, paint brush
: bulb holder
: wires
: bamboo stick
Our Documentation Ideas
Ziqq suggested a great idea which pushes the creativity level of our project. The suggestion was to do a video documentation. There will be interview sessions and snippets of the process.
Ideas on the video documentation
: brief description of our project
: interviewing session
:candid moments
: to create a teaser like to anticipate the viewers
: overview of the whole project
Minutes done by Sahida along with the pictures of the 2nd prototype
Robin's prototype's pictures by Zila
