Wednesday, May 13, 2009

PRODUCTION

1ST ATTEMPT!
6TH MAY 2009
Objective of the day: to complete the base of the sculpture.
Objective achieved.


Tuesday, May 5, 2009

FYP Meeting 2.
so what's next?

5th May2009
Meeting Objectives: Looking ahead!
Second meeting with Lydia.


So what's next?

Having shared with Lydia our prototype, we were rather hopeful as she told us that it does have a lot of potential.

Questions raised out of the meeting

- What's next after doing the lamp?
- How is your space going to be like?
- What would the audience take away after exiting our exhibition?
- What do we want the audience to feel or engage with our exhibition?
- How do we make it engaging?
- How do we show that this lamp or rather our whole exhibition would be something of what an art student would do, rather than what an SEG (engineering) student would do?
- What can the lamp do, when its not turned on?
- How do we further better/improve our whole overall project?

Basically, we looked into the next big step of this whole project, which is to look at how we are going to work with a space. And we looked into how we want the audience to feel once they step in our exhibition/space.

Lydia raised a point about things that can beautify/compliment the exhibition, like those fireflies buzzing around the exhibition trying to give the feeling of a fantasy world.

Which led to the team questioning how we can try giving a theme towards the exhibition which could further compliment our lamp and space.

After meeting with Lydia was over. The team stayed back and further discussed and shared to what they have to share. Sahida raised the point and recap about how we can use a theme to further compliment our exhibiton as it would help the audience engage with our exhibition. She also raised the idea of making our exhibition more engaging.

But that aside, we looked into what were going to do tomorrow with the first attempt in making the real thing (the lamp). All 100% focus moved to the making of the lamp which is our main priority at the moment. Robin led the way, by asking what were the things we were going to bring and how we can make this work. And we went to Home Fix at Causeway Point to get our wiring for the exoskeleton of our lamp!

Our current progress:
  1. The team is going to do their first attempt on the Lamp on 6th May 2009.
  2. We are going to try video-ing it down
  3. We are also in the midst of doing the storyboard for our video
  4. We are going to look into the video we want to produce by Mid-Point
  5. We are also in the midst of doing the 3D mock up of the exhibition on Google Sketch Up
  6. Also we are all looking out for exhibition or space for us to work on to showcase our work!

As share earlier, check out this light designer, I saw his books at the library and thought it was pretty cool. Ingo Maurer.

http://www.ingo-maurer.com/

Click under his products section. You can see all the different types of lamps and lighting.

Minutes done by ziqq

Wednesday, April 29, 2009

29 APRIL 2009
prototype!


Analyzing the prototype

Discussion: We went through the process of making the prototype. We thought of the possible ambiance for the prototype. We even talked about experimenting with different elements such as wires, paper bags, straws, scotch tapes, bubble wraps and newspaper.

Materials used: Chop stick, plastic, plastic bottle (1litre), rubber band, light bulb, tip of a plastic container


First prototype: motive is to try out the material used. (pictures from robin’s prototype)

-Plastic
:whether it melts if placed around a light source for a period of time.
: to see if the overlapping plastics can be very visibility

-Light bulb

: to see whether the type of bulb used has a better life span
: to see whether it breaks or spoil easily with abrupt movements
: positioning of the light bulb in the plastic bottle.

Question Asked
: can we try different material on the light source? What effect can it give?
: will a different material illuminates a certain kind of lighting or ambiance? What is it?
: due to the different kind of illumination from using different types of materials, what kind of location can the sculpture be placed?
: which type of light are we using? ( white or yellow?)
: what are the activities audience can do with each light? (reading, soothing for bed time?)
: what kind of light bulb size are we using? What will be the strength and weakness of using each light bulb size when placed at strategic spot?

Second prototype: motive is to experiment with different types of wire checking for sturdiness and weight limit.
-Wire (flimsy wires with plastic coatings used to tie up cables)
: to check out the sturdiness. First trail, I used one layer of wire to create an exoskeleton. But it was too flimsy to support itself.

Second trial, I double the layer by twirling it together hoping for a better support. But it was just too flexible and soft-like.

Process of making prototype 2:
Picture 1.1

This is the documentation of the second trial. In Picture 1.1, the wires are being twirl together to form a sturdy cylinder like exoskeleton.
Picture 1.2

In Picture 1.2, the twirling wires have been supported by using more of the flimsy wires.
Picture 1.3
After finishing the wires, strips of plastic are being cute to form the cover of sculpture. In Picture 1.3, there are cut plastic strips and sticky glue which are being used.
Picture 1.4
This is the output after gluing strips of plastic onto the exoskeleton.
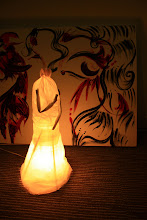
Picture 1.5 and 1.6
This is the finalized look when placed on a light source. From this documentation, I have tabulated that the type of wire which is a flimsy wire could not be used in our final exoskeleton sculpture.

REASONS TO WHY WE SHOULD NOT USE THE WIRE
: the flimsy wire has low tolerance of weight support
: in Picture 1.2, the exoskeleton tends to slant to the side showing the unsteadiness of the material
: the flimsy wires are too flexible even when doubling the layer by twirling the wires together

Analyzing the bottom half of the sculpture. The Skirt.

Discussion: Initially, we wanted to make the bottom half of the skirt to be something like ‘Wayang Kulit’. But we found some difficulties.
-Initial idea: to paint or draw a batik design on a light bulb.
-Current idea: to paint batik design on the plastic covers itself.

WHY?
: for aesthetic purpose
: to enhance the artistic version of our sculpture
: to showcase a versatility of paint in any material
-Lights used on the skirt
: 4 long fluorescent lights placed against each other
: normal rounded light bulb placed in a long series
Questions asked
: will the paint on the plastic fade off with it comes in a contact with water?
: wouldn’t the 4 long fluorescent lights be very heavy and not user friendly?


The making of our exoskeleton. TRIAL 1
(which would be carried our on 6 May 2009)

These are the material needed for the first trial.
: mechanical tools (screw drivers)
: hoola hoops
: rattan
: loads of white plastic bags
: batik cloth
: paint, paint brush
: bulb holder
: wires
: bamboo stick

Our Documentation Ideas

Ziqq suggested a great idea which pushes the creativity level of our project. The suggestion was to do a video documentation. There will be interview sessions and snippets of the process.
Ideas on the video documentation
: brief description of our project
: interviewing session
:candid moments
: to create a teaser like to anticipate the viewers
: overview of the whole project

Minutes done by Sahida along with the pictures of the 2nd prototype
Robin's prototype's pictures by Zila

Friday, April 24, 2009

Prototype Discussion
21/04/09

Before we discussed about giving the first trial for the main sculpture prototype, we explored the possibilities to enhance the appearance. Initially, we settled ourselves with a head on the body of the sculpture. Sazilah then initiated an idea to create a ‘Medusa-like’ photo holder. We scrapped the initial idea and adopted Sazilah’s. We got practical and provide suggestions such as how to create it, material used, how to attach the photo, the flexibility, length and weight issues.

We went on to the lower part of the sculpture which was the batik skirt. Ideas rushed in like running water. Robin suggested using plastic or strips of plastic as a cover instead as it illuminate light better than batik cloth. Robin then suggested doing a ‘Wayang Kulit –like’ effect which is shadow play. We managed to settle ourselves with moving shadows cast through the plastic cover. More suggestions were made and installing a long strip of Velcro was one of it by Robin. The reason behind it is for user friendly. It will allow users to change the design of the ‘Wayang Kulit – like’ effect and to change blown up bulbs. The existence of the Velcro is to also make cleaning easier and change of new bulbs easier.

We also consider what type of lights should we use in the main sculpture. One of the suggestions was to use Christmas lights. But considerations made by the team were will the light burn out the plastic over the sculpture, the colour and size of the light and whether it is waterproof.

these are sketches made by Robin. (click on images to view it clearer)

this was the interior of the lamp that ziqq shared which he saw when he went Ikea. The way the lightbulbs are hold inside the lamps are very interesting and they allow light to be given out equally from top to bottom.
sahida's final sketch on how the lamp cum photo holder would look like.
so this was what ziqq and robin meant by having a shadow that cast out on the bottom part of our lamp cum photo holder.
Material discussion
After finalizing our design, we discussed about the type of materials needed.
1) White plastic bags
2) Hanger wires
3) Wooden/silver pegs
4) Tin cans
5) Mechanic tools
6) Working gloves

Disco Ball Discussion
http://www.instructables.com/id/Saturday-Night-Fever-Mini-Disco-Ball/

Sazilah shared with the team about a site she chance upon called Instructables.com. Initially, we had doubts about breaking the CD as we were unsure about the outcome. But, this resource has enabled us to continue our vision to beautify our exhibition.

LINKS
wayang kulit: http://minyos.its.rmit.edu.au/~dwa/WayangKulit.html
disco ball: http://www.instructables.com/id/Saturday-Night-Fever-Mini-Disco-Ball/

Overview Of Addition Ideas
• Finalized design – ‘Medusa-like’ photo holder
• Change in material for lower part of sculpture – to plastic strips
• Install Velcro on the lower part of the sculpture
• The type of lights to be placed around the main sculpture
• Creating the disco ball
• For the exhibition showroom: cocktail table, more lights, shoe holder, bookshelves, rubik’s cube seats.
Pending Ideas
• Rubik cubes
: To be transformed into either arm chair, seats or stool which are to be located around the main sculpture
• Questions
: How many do we need?
: Expenditure
: Positioning of the Rubik cubes

• Mcdonalds (MCD) paper bags
: To make a statement by doing patch work and creating a lamp→ showing the numerous number of MCD consumptions
• Questions
: Can MCD paper bags illuminate sufficient light?
: Will the motive be understood by the mass?
: How do we get supplies?

Showroom Pending Ideas
: To improve the ambience of the exhibition

• Cocktail Tables
: To create an atmosphere where viewers can relax yet be amazed by the material used (rolled up tin cans for the surface)
: To be located around the showroom where viewers can still enjoy the main sculpture
• Shoe Holders
: To amaze the viewers with the material used (thick cardboard, tin cans)
: To provide a more welcoming gesture to the viewers. (boast comfort level)
• Bookshelves
: Material used will be cardboards
: To be placed around the showroom
• Paper Lights (IKEA pics that Ziqq showed)
: To display a wide range of lights around that showroom
: Material used either plastics or paper (MCD paper bags)

- sahida
------------------------------------------------------------------------------------------------------------------
So here are some of the pictures I shared with the team, the trip I took to Ikea.
After the Ikea trip, I saw alot of simplicity in the range of light design they have. Materials wise they used plastic and paper moslty, I even looked at the way they design inside the lamps to how they hold up the light bulbs which led to sharing of interseting ideas in the meeting as stated by Sahida above.

- ziqq


And of course, I didnt just look at the lights, I looked at everything, there were alot of smart design in Ikea, and this was one of them that struck me. I shared with the team how we can use carboardboxes to make these!BUT we still take in mind that the main priorty now is our lamp cum photo holder. That's our main priority, only after we will start doing the decoration and improving the ambient of our exhibition!

all pictures are taken from ziqq.
sketches are done by robin and sahida.